Adapting to a new (and hopefully temporary) marketplace
Along with a vast proportion of our industry, we found ourselves in a desolate landscape back in March 2020. Just back from a photoshoot and site visit for the start of a potential £250K project in West London, we were already concerned for our safety and that of others around us. I had one last project to complete in Lisbon, Portugal before a small break, the installation of a Meyer Sound Lina system in a large municipal cinema.
The day we completed the job, we found the cinemas and general public life being thrust into lockdown. One by one parts of our industry began to close down.
I wasn’t about to start worrying about business in the following weeks, as just a couple of days after completing the commissioning, I found myself suffering extreme fatigue in the workshop, unable to stand to work, I’d had contracted the dreaded virus on the way back from London. I was about to learn how precious air could be and what it feels like to be stuck at home, alone, feeling like you are dying. It would be 4 or 5 weeks before I could return to any form of functioning, but like the rest of Europe, we were now in a complete state of paralysis so I certainly wasn’t missing anything. All the other projects for 2020 had been totally cancelled.
Our industry relies on live events to make money, over the last decades big-business has stolen all the revenues from all but the top artists, a record deal pays nothing these days. Any project for musical production or public entertainment was going to be killed off immediately. That left the whole year’s calendar blank – quite a daunting prospect for any business. All our team are self-employed, as they prefer it that way. They go off and do their own thing in the space between projects and are highly skilled in such things. Our main workshop was a quiet and eerie place.
The day we completed the job, we found the cinemas and general public life being thrust into lockdown.
One by one parts of our industry began to close down.
Some 8 or 10 weeks into the situation, we found ourselves at our Lisbon base (it’s good to be based somewhere nice when you work worldwide) and were contacted by a local government theatre looking to re-start in a few months. They had a problem, a big problem. The technical director was an old friend of mine and he called me to get some advice. He knew I had all kinds of safety and working in contaminated environments training. He needed to know how he could treat things like microphones and communications equipment to sterilise or decontaminate them. We investigated the effects of alcohol, disinfectants, heat, time and UVC light. It turned out that alcohol was useless as it evaporates before it can do its job, unless the mic is immersed or in gel. Heat and disinfectants would ruin the equipment, and time quarantined required 5 days to be effective. We investigated how laboratories deal with the issues and what kinds of treatments our equipment could withstand.
As a result, I suggested he look at buying and using a bio-safety cabinet. He had already investigated the issue, but could only find mobile phone size ones for €400 or laboratory ones for €14,000. I laughed. €14,000 for a fridge with a bulb in it? “I can make you one for a fraction of that” I replied. “One that will do for microphones and your gear”. There was a long silence. Neither of us spoke, but both thought the same thing. There will be hundreds of people with this problem. There began a change in the direction of our company.
Research
We spent the next two weeks frantically and deeply researching the feasibility of the project. Digesting tens of scientific papers on the effectiveness of UVC as a sterilisation method, we read countless papers from CDC, Stanford, UCSF, WHO, ECDC and Philips on the effectiveness of UVC and how to ensure adequate doses. It looked like an accelerated learning session from the sci-fi movies (Matrix or Fifth Element) but we had to be sure. We could not afford any mistakes – a bit like rigging, the smallest mis-calculation and somebody dies. That said, we could not hang on waiting. On day 2, we started building a box. How big? How strong? We had just invested in a new small CNC router machine for the studio building business, a purchase that arrived during the lockdown and seemed a total waste of money this year. Just getting to grips with it, I fired it up and turned out a box that day. We decided it needed to be reflective inside so we got some mirror tiles that were lying about and cut them to size.
That was our first mistake. Mirrors won’t reflect UVC. Doh! That’s the value of research as you go, glass absorbs it, you can’t get a sun tan in a greenhouse. It turns out that EPTFE is very reflective for UVC rays, but that would be problematic to source and expensive. Next on the list was Aluminium foil, but that would be too fragile and easy to scratch off. Eventually we decided on a semi-matt aluminium sheet to diffuse the light as best as possible with maximum reflectivity, according to studies it would achieve between 70 and 50% reflectivity in the UVC band. That was OK for us. Stainless steel, however, which is used in medical devices, would be only 20% reflective at those frequencies.
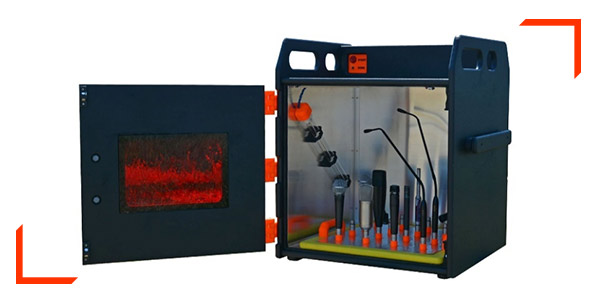
The first cabinet, just a cube with a door was just too difficult to handle. I didn’t want to fit it with flight-case handles if I didn’t need to, as they would be germ traps, and we needed it to be easy clean, so on day 4 of the project, version two soon appeared, with integrated handles on top which also helped make a secure store space for gloves and bags.
We decided against conventional hinges, as they would create small areas inside the chamber that were difficult to clean and would not be exposed to the UVC light, we decided on external hinges and it was obvious that we needed to make them ourselves.
Over the past year we had invested heavily in a farm of 12 3D printers to make bespoke hardware for the studios. Everything from plug shells for 25pin D-connectors to relay boxes for our own Arduino controlled sequential switch units. It was just the case of 3 hours on Autodesk Fusion 360 and the first hinges and handles were being printed.
We now had to design a way of presenting the gear to the light. Microphones were easy, In use the XLR is sealed, no virus will enter there and it is common to almost every microphone, a great way to mount a microphone, we engineered a simple tray with vertical XLRs at intervals that allow plenty of the diffuse light to pass between them for best exposure.
Looking carefully at the microphones it seemed that anywhere that light would not pass was unlikely to transmit any pathogen from the microphone unless the user physically inserted the mic into their body. Use of a light meter showed that most microphone wind shields pass more than 10% of ambient light, so as long as our dose was high enough, we would get in there. A 10X dose would be effective. Before the calculations were complete, we made a rough guess of 15 minutes as a safe operating time.
We decided on an Arduino as a controller, a simple, reliable, easy to source, cheap option. We wrote a simple C++ program to run a timer and illuminate a completed light. We worked on an interrupt for a door cut out switch but eventually settled on a brute force approach killing the 12V supply to the Arduino and relay as it was failsafe. UVC light can burn skin in seconds as I found out when photographing the inside of the unit, I had a welding mask on and an overcoat but the back of my hand was exposed to operate the camera, after only 10 seconds of exposure and an hour or two later, I could feel a mild sunburn.
The Philips light sources are vicious, so the door must provide a good safety interlock. To avoid mechanisms and complex forms that are difficult to clean we experimented with magnetic sensors, but we could not get sufficient accuracy with a simple unit to prevent the door having something like a small wire stuck in it and the unit still working emitting unsafe UVC. If we were to avoid having a whole load of ISO/CE regulation, the unit could never “emit” UVC.
All UVC must be contained safely. Eventually we settled on an automation end-stop position microswitch, perfectly reliable and allows for minor door misalignment (skew) if the box is not on a flat surface. Engineering for tight tolerances would result in unreliability, the unit had to be road-proof and work in all circumstances.
Week 2
We were into week two now. The first lamps were in and we were testing systems. For EMC reasons we wanted to keep things all within the aluminium screened exposure chamber, but it was becoming cumbersome, we had to pull the electronics and put it in an external top-mounted box. Prototype 2 was now in the bin. Version 3 was born, the CNC router spat out the next series of drawings as hardware and the 3D printers rolled out more designs of hinges and handles and control plates. This manufacturing set up was turning out to be unbelievable in flexibility.
The Version 2 prototype underwent strength testing on hinges and handles, the two 3D printed hinges and one 3D printed door handle were enough to suspend the 50Kg machine from our workshop hoist. No issues there, but still we opted for 3 door hinges as “insurance”, that way if a user breaks one the door will not fail. We were perfectly aware that if the unit failed it would put a whole show at risk. We were aware that the perception of 3D printed plastic could be that it was weak or unprofessional, we had to ensure it was more than adequate.
By now we have a second Utility frame manufactured from T-slot and 3D printed hardware. This frame will handle communications gear, lapel mics, belt-packs, radio mics, laptops, cameras, and DJ equipment.
Week 3
Week 3 now and we are well into the first production unit.
Still using Autodesk Fusion 360 where we have built all 3D printed parts, and CNC routed parts we now designed the PCB for the Arduino and relay A simple and fast process the PCB can be transferred from the CAD of the control panel to fit perfectly and we sent it off over the web directly that evening to JLCPCB for production, the first 30 boards arriving in 5 days for £10 the lot.
Week 4
After a nervous 4 weeks of constantly looking for reasons it will not work, we went through one last R&D audit. We had definitely put the cart before the horse in terms of development, but were aware that this had to move fast to be viable. The final UVC dose calculations came in…. We were badly wrong.
I don’t know how we had made assumptions so far out of the ball-park, we were going to have to make changes to the software. We checked and checked again, we cross referenced the data and checked again. It was no use, we were way out. With our lamps in this configuration the required direct exposure time for surface pathogens of the SARS Cov-2 nature would be killed in 1.5 seconds. We were at 15 minutes.
What do we do? Remove one lamp? It would certainly make it cheaper, lamps were hard to come by so it was a good option, but I wasn’t happy running the unit with one lamp, the opposing side crossed array was very effective in ensuring exposure and didn’t rely on refection or lack of shadows. No, we would keep it at two lamps. That way, even a lamp being smashed wouldn’t stop the unit working.
We could reduce the exposure times and increase the operating transparency of the unit. 30 seconds would be more than enough. I didn’t like the 30 second idea, it didn’t give me confidence. Thinking as a layperson it seemed too quick to trust. I know 3 seconds was all it needed on a surface and, even at 10% exposure through the grilles, 30 seconds would do, but it just seemed too fast to trust. As a layperson or artist seeing this, I get the feeling that they know they can boil a cup of tea in a microwave in two minutes and relate to that. People are scared, we have to give them confidence and, in my eyes, using an exposure time that they feel comfortable with is as important as the unit being effective or efficient. We decided it was so easy to program the Arduino, that we can offer factory time options all the way from 30 seconds to 15 minutes if a customer insists, but 2 minutes fits the aim of the project best. Keep people safe and make them feel safe.
We decided not to allow user options on time, as that would require the user to be competent to assess the required times and be susceptible to pressures to “hurry up” in a production environment. We like the two minutes as it also allows for unforeseen complications in exposure or bad machine loading. The unit has to be able to be safely used by instructed stage-hands.
Week 6
At 6 weeks, the first machine went out onto the market, from random conversational idea to final product rolling out the door. Fully CE compliant in just 6 weeks was an incredible achievement. Add to that, every piece of hardware being bespoke and in-house manufactured it becomes even more impressive. We also did all the documentation, certification, and built a webpage. A distributor was contracted, and orders received.
We have now developed a touring version in flight case with both types of holder as standard and custom designed shock-mounted lamps. More units are in the pipeline.
I cannot exaggerate how incredibly fortunate I was last year to decide to invest in 3D printers, CNC routers, and software like Fusion 360. Looking back, it was a stroke of genius that has saved me from ruin. But more than that, is the ability of my team and colleagues to adapt to new realities.
As an industry we are always solving people’s problems, making things fit, and adapting things that don’t work into things that do.
In these difficult times I can only encourage my colleagues and friends to not worry about what we can’t do that we always did, but to ask ourselves what can we do now to help.
